Wednesday, November 30, 2011

Monster fingers

Yesterday afternoon I got groceries, came home and unloaded them all and then put them all away. After that, I made supper. After that, we all ate. After that, I was tired. I sat down on the couch with a book so I could rest a bit before starting the whole process of cleaning up the kitchen and getting everyone ready for bed. Mr. Park took over with the kids and when he does that, it either turns into a quiet evening with music and drawing or a crazy evening with wrestling matches and a daddy monster chasing little children. Last night, it started out calm enough, but things quickly turned crazy when Mr. Park pulled out the kid's favorite game.

This game is a favorite with all kids, actually. Mr. Park holds his hands out flat, palm side down, and the kids, in turns, select a finger to push down. With every finger that's pushed down, Mr. Park makes a funny noise. Eventually, you never know when, someone will push down the finger that activates the monster. When that happens, all kinds of crazy breaks loose. Tonight, I decided to video the whole thing so you can get a feel for the suspense that builds in the room.


By the way, that high-pitched scream you hear above all the others is my 13 year old son's. And it's days are numbered.


Monday, November 28, 2011

Today, I'd like to talk about my husband. Mainly the fact that, 43 years ago yesterday he was born. His dad was playing football for the Oakland Raiders, so he was born in California, but they got back to Texas as soon as they could and I'm so glad they did!

I thought I'd give y'all a little photo tour of some of the things I love about my husband.


1. This is his favorite time of day. If he's outside working or goes outside to do something around this time, he'll almost always poke his head in the door and say, "Y'all come outside. It's gawgeous out here."


2. Same goes for an evening with a beautiful moon out.

3. His amazing ability to solve problems. He made this dog house several years back for our dog, Dixie. Last summer, one of our chickens fell in love with the spacious living area and thought it was the perfect place to lay eggs. As in 2 dozen of them by the time we realized she was in there. Consequently, a bull snake kicked her out because he found it to be a lovely place to lay around and eat eggs. With all those unwanted residents and the smells they left behind, Dixie decided she'd find another place to sleep. She's flexible like that. Since my husband had put so much work into the dern thing (it even has insulation between the walls) he was not going to let it go to waste. This past weekend, he took some hot coals from our fire and threw them in the dog house. He tipped it this way and that until the coals had rolled all over the place and thesmoke came billowing out. After about 20 minutes of this and a new paint job, it was good as new. Once we got Dixie's dog blanket in there, she thought so, too. Problem solved.


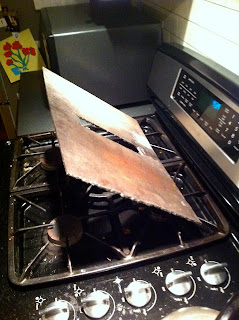
4. He's frugal, like me. Actually, he's only frugal in the areas he educated about, but that's why we fit together so well. Take for instance, energy efficiency. I don't know a whole lot about it so I leave that kind of stuff to him. I don't build fires, I don't change air conditioning filters and I DON'T touch the thermostat. We built our house 6 years ago and one of the things we were most proud of was the fireplace. But, as you probably know, fireplaces aren't the most efficient form of heating a house. Since our kitchen is across from the living room, my husband started using our gas range as a second heat source. This is what he created to direct the heat away from the stove so it could be circulated. Nerdy and engineer like? Yes, a little. (I am so attracted to the nerds!)


5. His ability to create. Not just beautiful art and music, but practical things like bookcases. And he's not a carpenter. He just sets his mind to doing something, researches a little, gets to work and viola, there it is. (If you know us personally, you know that this bookcase almost caused us to split up, but everything's good now! I'll tell that story another time.)


6. His ability to see usefulness in natural objects. He was so excited when he found this piece of wood that looked like a wood carrier. So naturally, he started using it as a wood carrier. He calls it his wood wood carrier which started a whole round of "How much wood could a wood wood carrier carry if a wood wood carrier could carry wood."


And this rock he found years ago. He pulled it out of his pocket and handed it to me and said, "Here, you can use this as a spoon rest next to the stove." And you know what? That's where it's been ever since. I couldn't get rid of it if I tried. It makes me smile. 


7. His love for Christmas and the magic of Santa. Even though we're nearing the end of the Santa-belief time, he's always gone all out to make Christmas special for our kids. From phone calls from the north pole to having someone bang on the roof while he told the kids to listen for Santa's reindeer. This is a note he left for the kids after he ate the cookies and milk they left for him. 


8. I love that a perfect day for him in the summer, is to have a slow, soaking rain and the Ranger's on a winning streak. In the fall and winter, it involves a pot of chicken soup on the stove and his favorite Adidas slicky pants. (by the way, they're about 20 years old, those pants.)


9. He's convinced that skinny ties are going to come back in style and when they do he'll be totally prepared.


Actually, he looks pretty awesome in a skinny tie.


10. He's confident, dramatic when needed, he's still got it on the basketball court and I love him!


Happy Birthday, honey!

Tuesday, November 22, 2011

The rolls you'll want to make for Thanksgiving this year. cont'd

Hi! If you're just joining me, I'm talking about yeast crescents. Basically, making them and eating them. If you missed the first part, it's here.


Here's how the dough looked when I got up this morning. That's how it should look.


Next you're going to be rolling out the dough so you want a large floured surface so it doesn't stick.


(Just a side note. See those tomatoes in the background? Those came from my aunt's garden. They were picked green right before the first freeze we had a couple of weeks back. I really had my doubts that they would ripen, they were just so hard and green. But what do you know, they're actually ripening. In fact, some of them are rotting. I'm hoping I can get to them before they're a total waste.)


Just plop the dough ball onto the floured surface. It will start to shrink a little when you handle it because the risen dough has lots of air in it and when you start to mess with it, that air comes out. 


Now divide the ball into two balls. 


Take one of the dough balls and begin to roll out into a large circle. I'm sorry a lot of these pictures are blurry. I had 3 cups of coffee this morning so I'm a little shaky.


Here's the dough all rolled out into a nice, big circle. You want to shoot for 12-15 inches across, but it's not important enough to get out a ruler. Just make it look like a large pizza crust.


Now, speaking of pizza, this next part is kind of fun. In fact, if you have kids around, and you're not a control freak, you can let them help with the next couple of steps. Take a pizza cutter and cut the circle into 12 pieces. 


This is what it should look like when you're done cutting. Of course, if your kids helped you out, it may not look like this, but it's no big deal because each one of those pieces will make a roll and they can be any size. Technically, this recipe makes 2 dozen rolls, but you may end up with more or less than a dozen and that's perfectly fine.


Now we're going to make crescents. Take one of the triangle pieces and spread out the top two corners a little and then roll it toward the small end.


Hey, look, a crescent!


Now you can curve the ends around so you'll have more room on the pan.


And here they are, ready to bake. You know, I've never made a batch this small before. In fact, tomorrow, when I make these for our Thanksgiving dinner, I'll be making 8 dozen. There's a sea of bowls and pans and there's flour and melted butter everywhere. It's quite a sight.


Set your oven to 375 degrees and while it's preheating, cover the rolls with a tea towel or plastic wrap and set it somewhere warm to rise again. If you wanted to freeze these for later, you could do that now.*


I put them on top of my stove because the warmth from the oven preheating was just enough heat to help them rise. I left them there for about an hour and a half. Are you're wondering why there are twice as many rolls now as in the previous picture? Remember when I separated the dough into two balls? I forgot about the other ball. Now there are 2 dozen rolls instead of 1.


When I took the towel off to check on them, they looked like this. Aren't they just so cute and chubby?!?


You can butter them before putting them in the oven or you can wait and butter them afterwards, OR you can butter them before and after. In fact, that's what I would suggest. Then put them in the oven and set your timer for 12 minutes. If you're not sure how your oven performs, check on them at 10 minutes and then every few minutes after that until you get the brownness you want.


After 12 minutes in the oven, this is what mine looked like. I used my little oven on top and apparently, it doesn't cook very evenly, but that's no problem because in our family we have two teams - team doughy and team done. So there's something for everyone on this pan.  I can't believe I just made a reference to the Twilight series. I'm not even a fan, but it's all anyone can talk about right now.


Don't forget to butter them again. This is just my opinion, but where bread is concerned, I don't think you can over butter.


Now would you look at that. That's perfection, right there. In fact, if you don't feel like you have enough things to be thankful for, make these rolls at once and you'll have one more thing to add to your list. ;)

Happy Thanksgiving!


*Put the pan in the freezer just like it is and leave it in there long enough to flash freeze them, then you can put them in a ziploc bag and they won't stick to each other. When you get ready to thaw them, just lay them out on a pan like they were and set them somewhere to rise.


Here's the recipe in case you just want to copy it:

Yeast Crescents

1 package dry yeast
1/2 cup sugar
1 cup warm milk
2 eggs, beaten
1/2 cup butter, melted
1 tsp salt
4 cups flour

Put warm milk in a small bowl and sprinkle yeast and sugar on top. Let rest for about 30 minutes. It should be foamy if the yeast is good. Pour milk mixture into a large bowl and beat together. Mix in eggs, butter and salt. Add half of the flour and mix well. Add remaining flour and mix until smooth. Cover bowl and let stand overnight at room temperature. The next morning, divide the dough in half and roll each into a 9 to 15 inch circle. Cut each circle into twelve equal wedges (a pizza cutter works great for this) and roll up beginning at the wide end. Shape them into crescents and place on a greased baking sheet and let stand until ready to bake. (Rolls can sit for up to 6 hours at this point.) Bake in a preheated, 375 degree oven for 12 to 15 minutes. Remove from oven and brush with butter if desired. Yield: 2 dozen




The rolls you'll want to make for Thanksgiving this year

About 15 years ago, my mom and I went to a Christmas cooking class together. I've forgotten most of the things we learned to make that year, except for one. I have 2 words for you. Yeast. Crescents.

I had been one of those people who didn't make bread. I just didn't. It was a complicated and delicate process and I just didn't have the knowledge or the discipline to be a bread maker. Besides, I thought, I'm too young to make bread. I have a life. There'll be plenty of time for that later when I have nothing to do but cook and clean and well, make bread.

Then I watched as the teacher showed, right in front of my eyes, how to make the most mouth watering, light and fluffy crescent rolls you've ever put in your mouth. It really was a simple process. Sometimes, it takes seeing something done right in front of you before you can actually imagine yourself doing it. That's what I'm going to do for you. After this post, you're going to be able to make yeast crescents for Thanksgiving and the only thing you'll regret is that your family will volunteer you to make them every Thanksgiving until the end of time.

Let me introduce the players...


There's a cup of milk, 2 eggs, 1/2 cup of sugar, 1 tsp of salt, a stick of butter, a packet of yeast and last but not least, 4 cups of flour.


Start by pouring the milk into a microwaveable container and adding the sugar. Heat it in the microwave for about a minute and half.


Next, sprinkle the packet of yeast onto the surface of the warmed milk and wait about 20 minutes. Basically, you're going to be looking for signs of life in your yeast. I had some in my icebox that I wanted to use, but I wasn't sure if it was still good.


See there. No good. This yeast has left the building. No life whatsoever. So I went to the store and got a new packet of yeast. Yeast is one of those things that you can't really keep on hand. That's why you test it.


Here's the second batch I did. This yeast is obviously alive and kicking and ready to make some bread rise! See that foamy consistency around the edges? That means that this yeast is happy and healthy and good to go.


Now, pour your milk mixture into a large bowl and stir to combine.


Next, melt your butter and add it.


Then, add the eggs that you've beaten.


And finally the salt.


Mix it all up and get ready to add the flour.


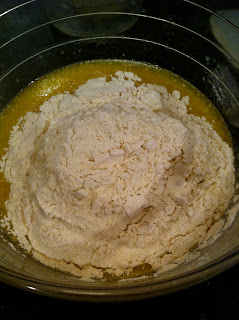
You can start by adding half of the flour, mixing until it's combined

and then add the rest.


Once you really get in there and start stirring, the flour will start to ball up. The stirring will get a little bit harder to do with a spoon so at this point, I usually just finish mixing it with my hands. Continue to mix until all the flour is incorporated into the dough. When you feel like you're done, if it's still sticky, add more flour. You want to be able to touch it and not have dough come off on your fingers.


See what a nice looking ball of dough that is!


At this point, you want to cover it up and give it some alone time. During that time, if the yeast was good, the dough should double in size. I'm not sure how long this takes because I always leave it overnight, but if you're doing this all in one day, it'll probably take a couple of hours depending on how warm it is in your kitchen. I had mine sitting on the kitchen counter and then Mr. Park built a big fire in the fireplace and we went to bed. One time, I got up in the morning to check on my dough and it had risen so much it was overflowing onto the counter, so if you think it may be too warm in your kitchen, you can cover it and put it in the icebox and then set it out in the morning to rise some more if it needs it.

I'm about to go check on the dough to see if it's ready to roll out so come back later today and I'll have the rest of the recipe up. It's gonna be delicious!