Tuesday, December 18, 2012

This is a PWCR kind of day. I'm having all my girlfriends over for coffee and breakfast stuff and good conversation, which I looooove, and then tomorrow at 2-ish, school's out for Christmas break! I've got lots of things on the agenda, but they're all pretty close to home and family. I'll probably share some of it later, but until then, I'm pushing the 'relax' button. Have a wonderful, slow, meaningful Christmas with the ones you love!


Oh, yeah, I almost forgot, I got featured on Knock Off Decor today. Well, my wreath did. Go check it out. And you might just want to add Beckie to your blogroll. Ideas abound over there. Seriously. There's knockoffdecor for all you department store hacks, infarrantlycreative for all around crafty goodness and roadkillrescue for before and afters that will knock your socks off!


Thursday, December 06, 2012

D.I.Y. Felt Mistletoe Wreath or The Only Christmas Craft I've Managed To Do This Year


As the title suggests, this is, in fact, the only real Christmas craft I've done this year. I've decorated my house with all my old stuff, some newer stuff and stuff I made last year, but I just haven't gotten around to making anything on my list for this year. To remedy that, last night I invited all my hardcore crafter girlfriends over for a craft night. I pulled out all my crap and laid it out on my counter and told everyone to go to town. Actually, true to form, the girls who came didn't need any of my crap because they had plenty of their own to work on. ;)


This is my inspiration. Last year I saw this on pinterest and fell in love. I quickly found out that it's a West Elm item and as usual with cute West Elm items, it was expensive and sold out. The edges of it reminded me of those fuzzy flannel blankets with knotted fringe around the edges. I wondered if I could make a wreath with a similar look. First, I looked to see if anyone else had made one, but as far as I could tell, no one had. That meant I had to put all my hacking skills aside and figure this one out on my own.

I started with a god-awful straw wreath I got at Goodwill, a string of pom-pom trim and a yard of darkish olive-ish green flannel material I found at WalMart. Yes, I know the title says it's a felt wreath, but I realized later that I was actually working with flannel. Felt would work, but it might be a little harder to work with because of it's thickness. The flannel turned out to be the perfect weight for tying all those knots.

I took the whole piece of fabric and laid it out on the counter and kind of wrapped one edge around part of the wreath, just to see how much it took to wrap it around and also have strips long enough to tie with no straw showing from underneath. When I had my measurement (my finger pinching where the place was I needed to cut) I cut the strip and it turned out to be about 16 inches wide. Of course, it'll all depend on your wreath and how long you want your strips to be.


Like the leftover polish on my thumb? I was waiting to meet with someone and nervously peeled/scraped the polish off all my nails but I was called in before I got to my thumb. I know, nice.


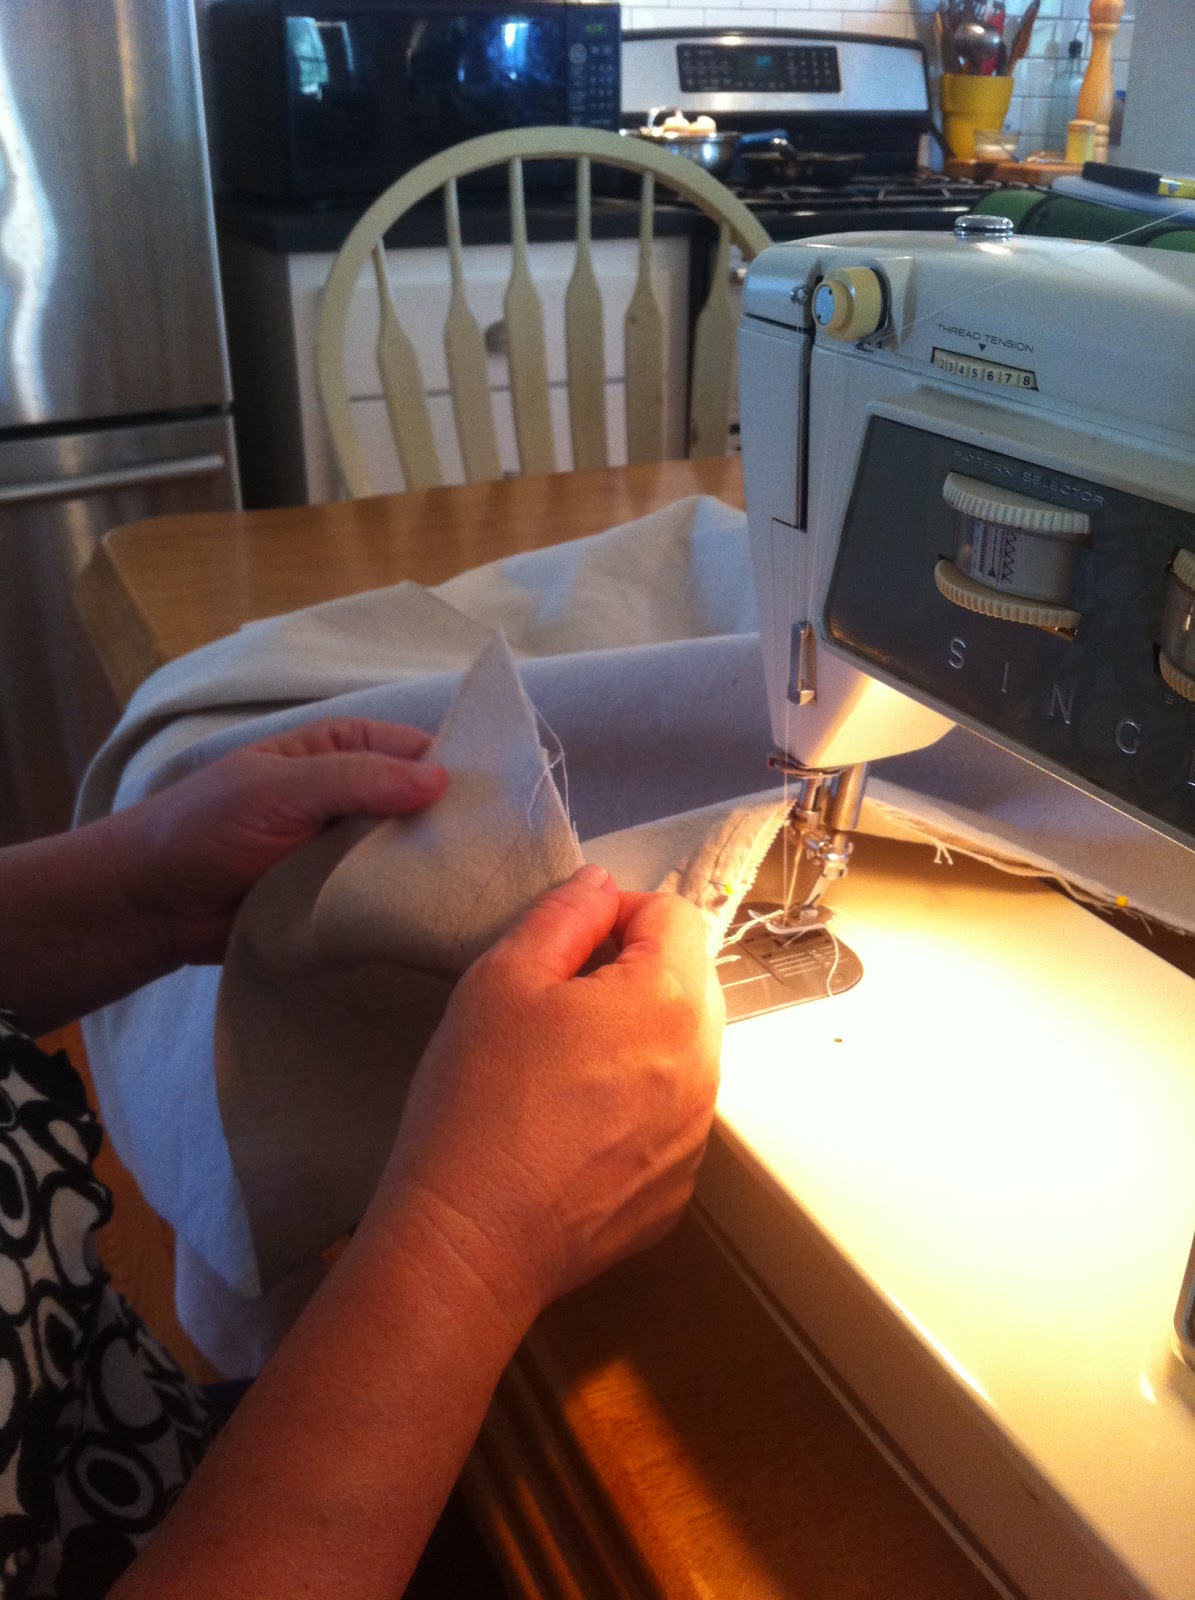
I took the wide strip I had just cut and folded it longways, and then folded it again longways. The second fold was just so I could keep all the little strips even when I cut them. I cut up to a couple inches from the fold and when I was done, I had this.


Now starts the mindless part because over the next hour or so you're going to be tying knots. Knot after knot after knot. And you're going to tie two knots. So, I guess that's technically a double knot. At first, I was doing right over left and then right over left for the two knots and then moving on to the next one. Then I noticed all my ties were facing the same direction so I realized I needed to mix it up. After that, I did right over left and then left over right and then switched it for the next one. This made it look pretty random with just a little fluffing needed at the end.


The strip in the picture above wasn't quite long enough to go around the entire wreath, so I just cut another piece and started wrapping it where the other ended. Since the fabric on the back is a little bunchy and the knots in the front cover so much, you can't really even tell that two pieces were used.

After all the knots were tied and fluffed, I noticed that I didn't like the squared off ends of the knot strips. This started the second tedious task of my night. I went around and rounded off all the square knot strips. Yes, there were a lot. But I wanted it to look a certain way and the way it was just wasn't doing it for me. I took a picture halfway through my trimming so you could see the difference. 


Now all I had to do was cut a bunch of pom-poms off the trim and hot glue them on.


And voila, there you have it. A wreath that bears some resemblance to the over-priced, out of stock, West Elm tree skirt from Christmas 2011.


Linking to these sites...

Shanty 2 Chic

Atta Girl Says

Holiday         HookingupwithHoH
DIY Show Off

Thursday, August 02, 2012

Overheard this morning

Autie had her friend Azo spend the night last night and this morning, when I woke up, they were hard at work on a project.

Me: What are you guys workin' on?
Azo: Umm, we're making cards to hand out to people. We're going to walk around the block and when we see people, we're going to give them a card and ask them if they want to donate food to the homeless.
Me: Oh, well what are you gonna do with all that food?
Autie: Well, we're going to look for some homeless people. Then if we don't find any, we're gonna eat the food.

Thursday, June 14, 2012

William Morris Thursday - A little of this and a little of that


I just couldn't write another WM post with 'random' in the title so I switched it up a bit. Even though it's really more of the same thing.

I feel like I've been hit with an avalanche of projects ever since I pulled that one out from the bottom of the pile. Kind of like that orange that looks so perfect you have to have it. Then all the rest come tumbling down after it. Now that school is out, and since I'm the teacher that's important, I have the freedom to flit from one project to the other without the pressure of finishing and cleaning up so we have the space to do school. That's also my number one problem right now. Too much free time with no schedule. My house looks like a crafter's disaster. Here's a sampling of what I've been working on the past two weeks...

Switched out my dining room light fixture from this


to this. Ah, much better. I'm still not sure it'll stay white and I don't know what to do with the dingy, bland cord, but it's an overall improvement. I'll also mention that projects like this and this can sometimes be good for your marriage. ;)


Took a couple of thrift store lamps, spray painted them white, added semi-homemade shades and called it a day.


Made a hanging planter out of an old colander I got at the ReStore for a dollar and planted some Purslane in it. Speaking of edible weeds, have you ever tried Purslane? It's a little bit tangy and spicy and my husband loves it so much that he grabs a sprig and eats it every time he walks past it. I'll post a little toot on how I did it later. Until then, here's the finished product hanging on the porch.


And, to be fair, I thought I'd include a hair-brained idea I had and followed through with and promptly deemed a failure. I bet you're just dying to hear about this one.

Here we have a shirt that I bought at Goodwill for $cheap.99. I love it. Or should I say, I loved it. It's Ann Taylor Loft and it's light and soft and I love the colors in it. (You'd probably agree with me if I hadn't taken a picture of it like it's a slipcover for my couch.) Then I wore it a few times and spilled stuff on it. Because ladies, that's what I do. I'm not a careful eater and I'm not gentle on clothes. I don't usually follow the standard rules of laundry either, so I ruin a lot of stuff accidentally. That's also why I try not to borrow things. But that's another story for another time.


Some of the stains I wouldn't really even consider stains. They're more like mystery spots. Sometimes they show up and sometimes they don't. (Maybe what I need is an exorcist) My point is that it wasn't bad enough to just throw the shirt in the giveaway pile, but it was getting a little too dingy for me to feel comfortable wearing. I once dyed a white skirt of my daughter's blue because I couldn't get a stain out but didn't want to part with it. It worked beautifully so I decided to try a similar measure on the shirt. I didn't want to go with blue, which is the color dye I already had on hand, and I didn't want to wait because I'm not good at that. I was in the kitchen when I noticed my coffee pot sitting there, with about 3 cups of coffee in it from that morning. The next thing I knew, I was stuffing the shirt into a big metal bowl and pouring the coffee over it. This is what I ended up with. And I liked it.


Then I went and washed it. That's what you do after you dye something, right? Well, apparently my laundry detergent can't remove mystery stains, but it has no problem removing coffee stains. The shirt came out the same dingy white it was before except for one small area. Actually two areas. The coffee and subsequent washing somehow made sweat stains that were practically invisible before this experiment bright yellow. So now I have a dingy white shirt with bright yellow stains in the arm pits. Nice.


Maybe I'll try again and let the coffee sit longer or maybe there's something that I can use to 'set' the stain before I wash it. Anyway, I'm not quite ready to let the shirt go. I'll keep you updated. I know this is riveting subject matter and I don't want to leave you hanging. Like the shirt. You know, hanging. Thanks, I'll be here all week.

And here's a peek into what I'm working on for next week. It involves using my newly acquired WM skills to make some money. Hopefully.


Thursday, May 24, 2012

William Morris Thursday - random projects


Last Thursday, my incredibly sweet friend, Brenda, came over to help me work on my couch project. We had already gone shopping for our supplies the week before so we were ready to start laying and cutting fabric. It was kind of scary when we made the first cut, but after that, I kept reminding myself that I wanted the pieces to look comfortable and a little slouchy. I'm positive whatever they end up being they'll be slouchy.


We got one couch cut out and pinned and we were out of time. Yesterday, she came over and we got the other couch cut out and pinned and started to work on the piping. Some of my friends couldn't believe I was actually going to go to the trouble of making piping, but even though I want it slouchy, I don't want it sloppy.


Both Brenda and I have sewing machines, but we decided to use hers because she's already familiar with it. Since I haven't, ahem, ever used mine, we didn't want to waste time learning how to use my particular machine. I've gotta tell you, sitting at that sewing machine felt really good. If I believed in past lives, I'd be convinced I was a seamstress in mine. We used a method we found on YouTube for making the strips for the piping and then we pinned and sewed until it was done.

After spending a couple of hours at the sewing machine, I was pretty proud of my accomplishment. My husband came home and I showed him the great pile of piping I had created and we had this conversation:

Me: Look at all this piping I made this afternoon. Can you believe it?
Him: Yeah, that's great.
Me: I don't think you're seeing what I actually did here. I sewed all. this. piping. This here. I sewed
it. On that machine over there. I sew!
Him: What I'm wondering is, do you cook?


So, we've covered two couches, pinned them and made half the piping we need. All we need to do is sew the couch covers, make the covers for the cushions and make and sew on the skirt. Goodness, this is an involved project!

In between the sewing and pinning, I made a sign for my fireplace mantle and covered some lamp shades with sheet material for the girl's room.


P.S. I made the sign out of wood from an old pallet that's been trashing up our backyard for at least a year. The lampshades were half off at Hancock's. The lamps came from the dollar store and I spray painted them white.

I'm linking up with Jules' William Morris project. More here.


Thursday, May 17, 2012

William Morris Thursday - my children


Even though I start little organization projects every day, projects that don't always get finished, I don't always feel like I have enough to share when it comes time to link up with Jules' William Morris project every Thursday. Although this week isn't any different, I thought I'd share something I started that I'm determined to finish. In fact, my sanity depends on it.

I homeschool my 3 youngest children (all girls) and because they are home with me all. day. every. day. we're all going a little stir crazy waiting for summer to begin. I have said from the beginning that in addition to the regular schooling they'd be getting, I would teach them home skills, too. I don't want my girls to leave my house not knowing how to take care of themselves or their homes. At different times throughout the year, I've started some sort of chore chart system but for one reason or another because of my lack of discipline it wouldn't stick. Then I realized something. While I've been putting into practice the William Morris quote, "Have nothing in your houses that you do not know to be useful, or believe to be beautiful." in the physical rooms of my house, I hadn't thought of applying it to my children. While they have always been and will continue to be a thing of beauty in my eyes, they have not started being, how shall I put it, "useful."


I'm crazy about them, but they're 6, 8 and 10 and they haven't ever done much in the way of regular chores. I go on occasional rants and give them things to do as consequences or follow them around reminding them of things they should be doing, but there hasn't been any system set up so they could learn to own their work and feel good about contributing.


Yesterday, I came up with all the chores I want them to be able to do on their own after some training, and put the steps in a list with a place to check them off as they're completed. I put those lists in plastic sleeves and put them in a binder. I haven't figured out yet how the specific chores will be assigned or how often, etc. but getting the binder done has already made me feel like this is a do-able thing. And of course, once they've mastered the chores, the lists will need to be altered and probably more complex chores added. Of course that's a problem I look forward to. ;)


Just this morning, my self-motivated daughter asked if she could wash the dishes. She already had the binder opened up to the dish washing page and was ready to go. I just gave her a little direction to get started and she ran with it.


On the project front, later today, my friend and I will get started using this:


 To turn this:


Into this:


Source

Hopefully next week I'll have something to share!


Linking up with Jules' at Pancakes and French Fries.